
Nothing Protects Like a Cannon™
Since 1965
e Lifetime Safe Company™
Rev. 10.01.20
Getting Started
Handle Assembly
Battery Installation
WARNING
Tip Over Hazard
Failure to secure the safe as shown in these instructions can result
in a child or adult being seriously injured or killed. A child or adult
can accidentally tip over the safe. Children should not play with or
around the safe at any time.
Battery Disposal
Please dispose of the used batteries per municipal or provincial law.
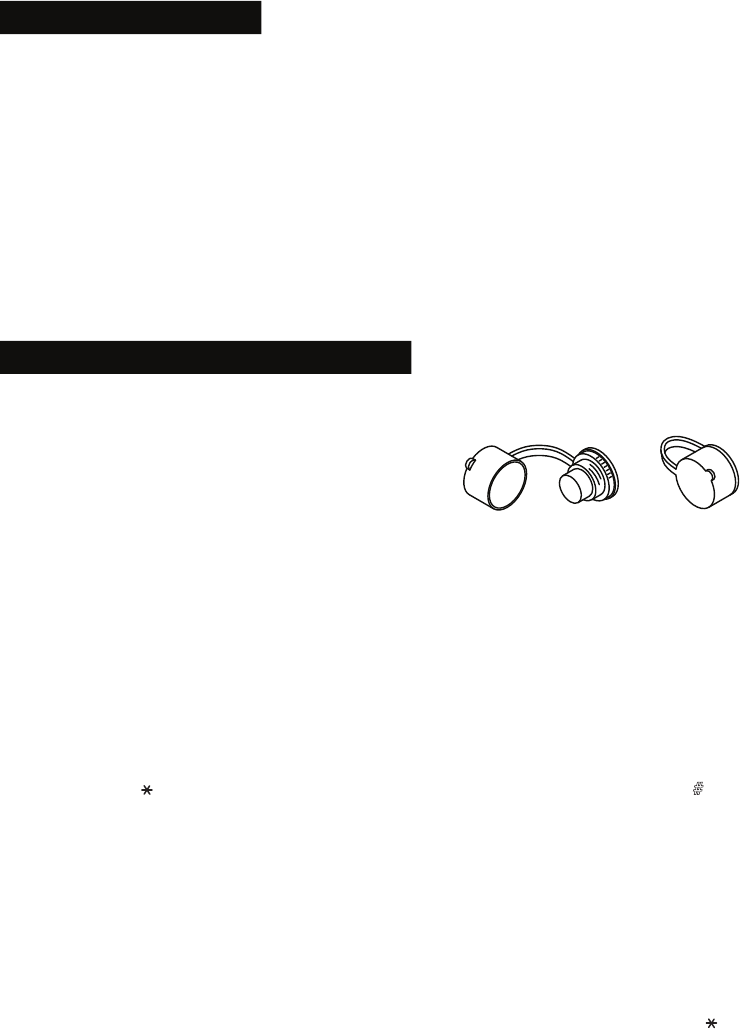
For safes with multi-spoked handles, remove the spoke that is
included in the instruction sheet bag and screw it into the hub
and hand tighten.
NOTE: Do not use this handle to move the safe.
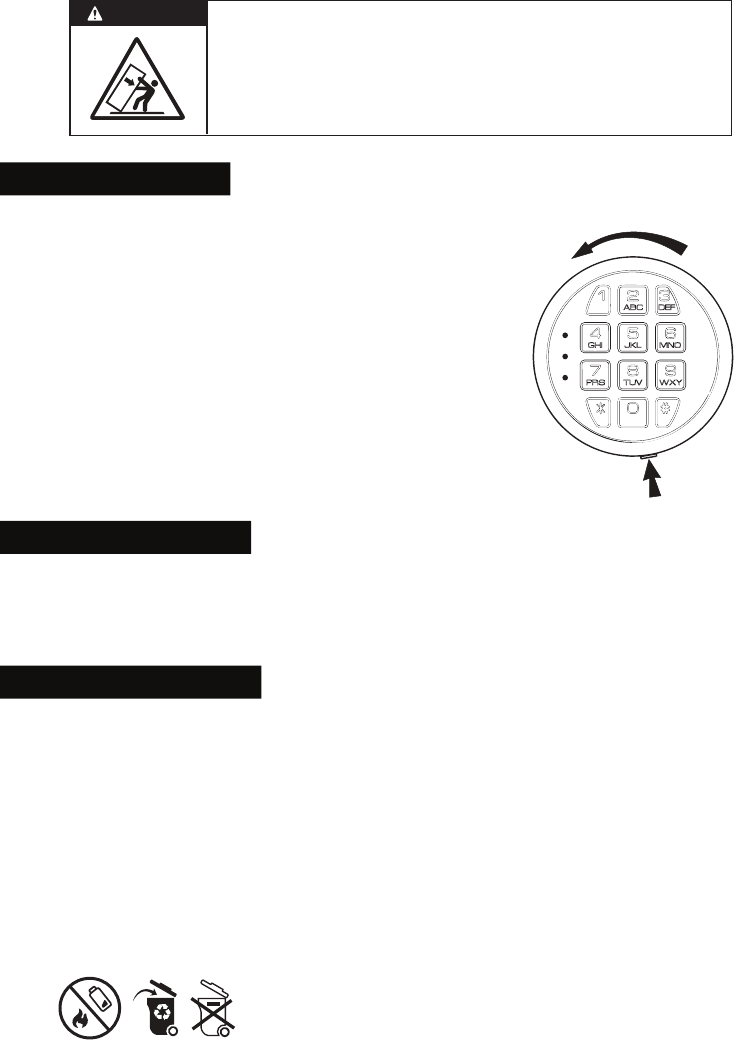
Remove the key from the packet and follow the steps outlined below:
1. Remove the keypad face by pressing the tab and turning it as
shown in the illustration. The keypad can hang by the connecting
cable while unlocking the safe.
2. Insert the key in the key hole and turn clockwise 1/4 turn (until
stopped) in order to unlock the safe. Rotate the handle and open
the door.
Screw the remaining handle spokes into the hub and hand tighten.
NOTE: Do not use this handle to move the safe.
NOTE: When changing the battery, always hold the battery connecting cap while disconnecting
or attaching the battery. Do not pull on the wires. Doing so could cause the power supply to
disconnect from the lock.
This safe uses one 9V alkaline battery. Under normal use, batteries will last about 1 year.
When the battery is low, a red indicator light will appear on the keypad after pressing any button. Be
sure to test your battery every six months by entering your code. If the low battery indicator light
appears, replace the battery promptly.
To replace the battery, remove the keypad face by pressing the tab and turning the keypad face as shown
in the illustration. Replace the old battery and screw the keypad face back in place.
TAB
40-0000012
Electronic Lock
Entering Your Security Code
Before you can enter any numbers, touch any key on the keypad to activate it. The keypad will stay
illuminated for approximately 10 seconds.
After installing the battery, the electronic lock is ready for use. To use the lock for the first time, press any
key to activate the keypad followed by the following numbers/symbols in this order: 1 - 5- 9 - #
These numbers are preset.
NOTE: You should change the entry code as soon as possible after opening the safe to insure
proper security.
After entering the factory code, turn the handle clockwise to open the door. You will have 5 seconds to
turn the handle before the locking mechanism is reactivated.
NOTE: This safe includes a red reset button
located on the inside of the door and covered with
a removable cap. In order to use this reset button,
remove the cap first.
Replace the cap securely over the reset button after
setting your combination. Failure to do so will
compromise the safety and security of the safe.
To enter your personal security code you will need to follow the steps listed below:
1. After opening the electronic safe (with the preset factory code of 1 - 5 - 9 - #) locate the small red
reset button on the inside of the door near the hinge.
2. Press the red reset button and then release it; you will hear a beep. A yellow light on the faceplate will
activate and stay on for a period of time while you enter your personal security code. You can only
enter the code while the yellow light is illuminated.
With the door open and the yellow light activated, enter your 3 - 8 digit code. Confirm your code by
pressing the symbol on the keypad. Before closing the door, enter your code followed by the # symbol
to be sure that it releases the handle and allows you to turn it. You should see the live action bolts retract.
If the code fails, go through steps 1 and 2 again. If the code works successfully, record your combination
number. If you write down your combination you must keep this information in a secure place, away from
children, and not inside the safe. You should then close and lock the door.
NOTE: DO NOT SHUT THE DOOR UNTIL YOU HAVE CONFIRMED THAT YOUR NEW SECURITY
CODE WORKS CORRECTLY.
If an incorrect code is entered 3 times, the safe will automatically lockout for 15 seconds. If an incorrect
code is entered 2 additional times, the safe will not allow any other codes to be entered for 5 minutes.
NOTE: If you press the wrong number while entering a security code, you can press “ ” to
erase that entered number.
40-0000012

Locking The Safe
Step 1: Open safe
Step 2: Take out any removable interior parts.
Step 3: Remove the 2 lag screws using a 15mm socket and ratchet, then close and lock safe door.
NOTE: Use caution as the safe is top heavy and due to the mass of the door, can tip easily when
moving; installing the safe will take two or more people.
It is highly recommended that you seek the services of a trained professional to install your safe.
Removing Safes from Pallet
Backup Key
If the incorrect security code is entered 3 times there will be an automatic lockout for 15 seconds before you
can try your code again. If the incorrect code is entered 2 additional times there will be a 5 minute lockout
before you can try your code again.
A "Backup Key" has been provided in case you have forgotten or lost your security code. To open the
safe using the back up key follow the steps below:
1. Remove the lock face by pressing the tab and turning the lock face as shown in the illustration on
page 1 of this manual.
2. Insert the key in the key hole and turn clockwise 1/4 turn (until stopped) in order to unlock the safe.
Rotate the handle and open the door.
3. Keep the door open until you have entered a new security code. Before entering your new code,
remove the key and screw the cover back in place.
4. Enter your new security code following the instructions for entering your security code
Protecting Your Code
Lockout Mode
Silencing the Keypad
The factory preset code is 1 - 5 - 9 - # and should be changed before using the safe. It is the owner’s
responsability for safekeeping of the new code.
Selecting Your Location
For optimal security your safe must be mounted to the floor. The safe should be installed adjacent to a side wall
with minimal space on either side of the safe in a dry, isolated and secure area.
The safe should be flat against the wall and floor. Remove the baseboard if necessary.
CHILDREN SHOULD NOT PLAY WITH OR AROUND THE SAFE AT ANY TIME.
You can turn off the “Beep” sound of the keypad by entering the code - 6 - 3 - 3.
To turn the “Beep” sound on, enter the code - 6 - 6.
To lock the safe, close the door and rotate the handle counterclockwise until it stops. If the handle is not
turned until it stops, the locking mechanism will not lock.
NOTE: Because the locking mechanism is deactivated for approximately 3 to 6 seconds after the
combination is entered, wait a minimum of 6 seconds from the time the combination is entered to
lock the safe.
NOTE: Always confirm the door is closed and the lock has engaged before leaving the safe unattended.
40-0000012
Before determining where to place your safe, verify the load bearing weight capacity of the floor
where the safe will reside or stairs the safe will be moved over. Measure doorways ahead of time
to be sure your safe will safely pass through the necessary doorway. Select a location that is
suitable for bolting down your safe for extra theft protection.
Cannon Tips
• Use only Duracell or Energizer batteries that expire 5 years ahead from current year.
Change battery at least every 6 months.
• To bolt the safe use red head anchors 3-3/4 x 3/8.
• Before mounting the safe make sure to write down the serial number.
• Do not put safe in a damp or humid area.
• Keep page 2 of this manual somewhere safe and away from children (not inside the safe).
• Do not overload the safe; overloading the safe can put pressure against the door which can keep the safe
from closing properly.
• Avoid applying excessive force to the handle. If the safe does not open, please call our support team at
+1 (847) 665-1635.
Recomendations
Cannon recommends seeking the services of a professional to install your safe; local safe
dealers and locksmiths usually offer this service. By choosing to install your safe on your own,
you agree to take any responsibility for damages (physical or to your property) that may occur.
NOTE: Do not store electronic media, computer disks, SD cards, audio-visual media or
photographic negatives in this safe. In the event of a fire, these materials will not survive the rated
internal temperature of the safe and could be damaged or destroyed.
Securing The Safe
NOTE: For maximum security and to ensure waterproofing, this safe MUST be mounted to the floor.
Failure to do so will compromise the safety and security of the safe.
IMPORTANT: The safe must be removed from the skid/legs and fastened to the floor using
appropriate hardware. Failure to do so will void the warranty.
Place the safe in the desired location. With your safe open, lift the interior carpeting up and locate the
mounting hole bushings. These bushings are filled with fire resistant caulking which must be drilled out
before mounting the safe to the floor. Use a 3/8" diameter drill bit to drill out this caulking. Continue to
use this drill to mark the hole location on the floor. Move the safe away. Drill pilot holes in the floor as
follows: For a wood floor drill 5/16" diameter x 2-1/2" deep pilot holes. For a masonry floor drill 7/16"
diameter x 2-1/2" deep pilot holes for the anchors.
IMPORTANT: When you drill out the fire resistant caulking from the mounting holes, you must
mount the safe to the floor using the lag bolts and gasket washers. Failure to do so will void the fire
rating and waterproof rating.
Reposition the safe and secure the safe with the lag bolts and gasket washers. Replace the carpeting.
WARNING: Because this safe is waterproof it will float if not secured. As the water level rises, the safe
will begin to float and could fall over causing personal injury.
40-0000012

Serial Number
• Where can I find the serial number for my safe?
Your serial number can be found on the right, outside body wall of the safe, in the upper left corner.
The serial number will be on a small silver sticker.
Model Number
• Where can I find the model number for my safe?
Your model number can be found on the safe door. It is advisable to record this information and store
in an easily accessible location.You may not be able to provide this number if locked out.
Opening / Closing My Safe
• I get two beeps but the safe door is not opening?
Please check the battery. We recommend using a new Energizer or Duracell alkaline battery wtih an
expiration date of 5 years in the future.
Also, please try turning the handle to the right, without letting go of the pressure put in the code, then
turn it to the left. Once you hear the 2 beeps your safe should open.
NOTE: If these steps do not work please contact our customer service team at +1 (847) 665-1635.
• What do I do if my safe won’t lock?
It is important to make sure there is no pressure on the lock. Please ensure that the items in the safe
are not putting any pressure on the door of the safe when it is closing. If you have anything that could
add pressure on the door please remove it and attempt to lock your safe again. If you are still not able
to lock your safe please call Cannon’s Customer Service for immediate help at +1 (847) 665-1635.
Combinations
• Can I change my digital lock to a EMP lock?
Unfortunately, it’s not possible to retrofit an EMP lock on a digital keypad since each model of safe
comes with a specific lock.
• What do I do if I lost my combination?
We advise first contacting the dealer at which your safe was purchased. Provide them with your serial
number located on the safe (typically on the right side of the safe in the upper corner). They will
contact us directly in regards to your combination. This is required for safety.
NOTE: You may also visit www.cannonsafe.com for lost combination assistance.
• What happens if I lost my combination and I bought the safe from your website?
Cannon is not responsible for lost codes. If you purchased the safe from our website, please contact
us so that we can help you. If we are not able to assist with your safe, a locksmith will be requested
for you. This falls under your 30 day Warranty for combinations. We will need the serial number and
potentially other purchase information before opening the safe
Warranty
• Does my Warranty cover me if I lost the combination to my safe?
The Warranty does not cover lost or forgotten combinations, improper opening procedures, weak or
battery failures. Electronic and EMP locks carry a one year warranty for Labor and a lifetime warranty
for parts.
For assistance with your warranty or problems with your safe, please call us at +1 (847) 665-1635.
For more FAQ, check our website www.CannonSafe.com/faqs
FAQ
40-0000012
Limited Lifetime Warranty
This Cannon Safe carries a lifetime Warranty in Residential Use. It is Warranty against defects
in workmanship and materials, also against damage by attempted break-in or actual break-in,
natural flood and fire. Commercial or industrial applications carry a 1 year warranty against
defects in workmanship and material.
In order to obtain service under this Warranty, purchaser must provide Cannon Safe Inc. with
following items:
Cannon Safe Inc. may, at its discretion, repair or replace any defective or damaged safe.
Whenever possible the safe will be repaired locally. If Cannon Safe Inc. is replacing a safe, we
will require the old safe to be returned to the factory. This being the case Cannon Safe Inc. will
pay for the return freight to the factory. The purchaser must have the safe emptied packaged
and palletized and available for a curb side pickup at their expense. The Warranty does not
cover labor costs for opening, removal or installation of the safe and contents. Personal property
in the safe is not covered.
The obligation Cannon Safe Inc. has under this Warranty is contingent upon proper installation
and use of the safe, and shall not apply to parts or safes which have been misused, neglected,
or put in unusual or extreme environment.
Modifying tampering with the safe, which might affect the product’s use, voids the Warranty.
Without limit, this Warranty specifically excludes any liability for defects or damage caused by,
or aggravated by, the use of unauthorized parts. Upon delivery, purchaser must promptly notify
Cannon Safe Inc. of any defect. Purchaser’s remedies are limited solely to repair or replacing
parts and are at the discretion of Cannon Safe Inc.
Electronic and mechanical locks carry a one year Warranty for labor; a lifetime warranty for
parts. If at any point Cannon Safe Inc. changes components, the current component being
used will be sent as replacement. The Warranty does not cover lost or forgotten combinations,
improper opening procedure, weak or dead batteries. Paint is warranted for one year based on
proper care and environment. This Warranty only applies to safe located in the continental
United States, for residential use, and purchased at an authorized Cannon Safe dealer.
Commercial or business use carries only a 1 year Warranty.
This Warranty is given in place of all other warranties and assurances, whether expressed or
implied, including but not limited to matters of quality, fitness for purpose, or merchantabilty and
Cannon Safe Inc. accepts no liability, under any incidential or consequential damage or loss
suffered by anyone as a result of using or being unable to use the safe.
1. Proof of purchase
2. Police or fire department report
3. Photographs/ Video of damaged safe
4. Written testimonial
40-0000012
Warranty Registration and
Customer Support
Should you ever need help with your safe, registration helps verify your identity and allows us to
provide faster service. Please fill out the section below and store with your original receipt in a safe
location OUTSIDE of your Cannon Safe.
Online: CannonSafe.com/service-center/register-your-safe
Customer Service: +1 (847) 665-1635
Customer Support Hours*
Monday - Friday 6:00 am - 4:00 pm (Pacific Standard Time)
Excluding Holidays
*Hours subject to change. Please visit www.cannonsafe.com/contact-us
SERIAL NUMBER
(
This can be found on the right side of the safe on the top left corner
)
DATE OF PURCHASE:
PURCHASED AT:
MODEL NUMBER:
Register Your Safe
www.CannonSafe.com
The Lifetime Safe Company
40-0000012
